Written by Sarah-Anne
I have a confession to make. For the past three weeks I've been dreading making a new post, despite having more than enough completed projects to document. I've had no ambition, no desire, and no inspiration to do anything creative whatsoever. With everything going on in the world right now (and working full-time in a front-line capacity) it has taken all my mental energy to simply get through the day-to-day activities... and from the sounds of it I haven't been alone.
Right now more than ever we need beauty, we need light, and we need that inspiration to keep on creating. So for my small part, I would like to share with you the project that gives me the most delight since I started this blog. I present to you my take on a Vardo, inspired by the Gypsies (Roma) of Eastern and Central Europe:

I have had the idea to make these since last Autumn, and it was the Malifaux tournament I ran back in January that finally gave me the push to create them. They will eventually find a place on my Frontier Homestead table, and provide much needed colour and character to future games!
Materials required:
foamcore (with the paper backing removed)
styrene sheets, in various thicknesses and textures
styrene tubes, in two different diameters
cardboard toilet paper or paper towel roll
PVA glue
thin plastic cement
super glue
Mod Podge Matte (tinted with black acrylic paint)
Mod Podge Gloss
White primer (spray can or air brush)
clear acrylic sheets (used for overhead projector slides, etc.)
Assorted acrylic paints
Dark brown and Sepia Ink Wash
matte spray sealant
artists pastels or weathering pigments, assorted browns
balsa wood strips (1/4" x 1/8")
Tools required:
hobby knife
Pencil/pen
Carving tools/cocktail toothpicks (plus a thin metal awl for texturing the styrene sheets)
Hobby snips/sprue cutters
Assorted paint brushes
sewing push pins
When I started this project (as seems to be common with how I craft/) I had a general idea of the final shape and dimensions I wanted, and after comparing to some 28/32mm models decided to make them approximately 12 mm long and 6 mm wide (though each roof overlaps those a bit). The wheels had a final diametre of 4.5 mm. I knew I wanted two final wagons, and wanted each to have a slightly different shape. I had the external walls of each side angle out slightly towards the roofs, with one having a flat roof, the other curved. After deciding on the general size, I cut out the base of the floor and sides (plus some extra internal supports) out of foamcore.

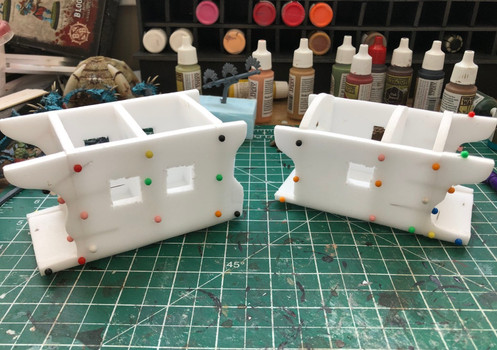
Next I cut out where the windows would be. Again keeping them slightly different, I gave one two windows on each side, and the other, just one.

Next I attached the walls to the floor (along with the internal supports) using PVA glue, and used my trusty sewing pins to hold them all together until completely dried. You'll notice one of the vardos has decorative curves along the back where the rear door will be: both will have similar detailing, but I experimented with whether it was easier to cut it out along with the sides, or to add it on separately. In the end I realized either was worked well, and had more to do with how detailed and small you wanted the decoration to be. The more intricate a design you want, the easier it would be to add it on separately.
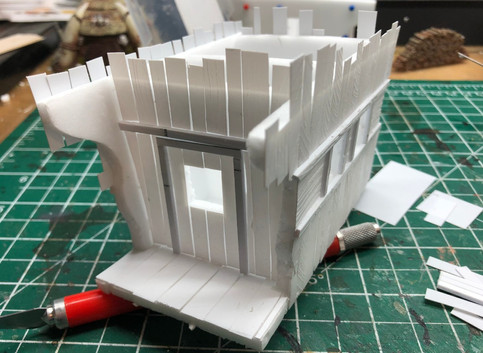
Using thin strips of styrene, I started adding the wood 'planks' along the exterior. Before adding any glue (PVA again) I played around with the strips to come up with a design I was happy with. It may be hard to see in these photos, but I textured the strips using a sharp narrow awl to give them the look of wood grain. When placing the strips together, I made sure to have strips with wood grain angled in different directions placed next to each other.
After the glue had dried completely, I trimmed off the excess styrene with hobby snips. I used the point of a cocktail toothpick (but a sharp pencil would work too) to carve wood grain into the foam that was left exposed. I also added additional decorative trim in slightly thicker styrene around the windows and doors, and to break up the large, flat surfaces.

For the wheels, I was hoping to find an inexpensive option from a dollar store toy or other hubby kit, but couldn't find anything that wouldn't break the bank. So I had to craft a solution, and found the best option was to use a cardboard toilet paper (or kitchen paper) roll cut into very thin rings, covered with two thin strips of styrene, cut slightly wider than the cardboard. The first layer of styrene was glued to the cardboard using PVA (with the two ends of the styrene attached together using thin plastic cement) in the circle interior, and then the second, wider, layer attached to the exterior.
The PVA glue ended up wetting the cardboard causing it to loose its rigidity, so to keep the circular shape until all had dried completely I supported it by placing all the rings along the cylindrical PVA bottle (which was luckily the perfect diametre!). To create the spokes, I used the thinnest styrene rods I had using a larger styrene rod at the centre. I used the same thinner rod for the axle, and fixed it in place using plastic cement.
Then the stairs for the back, and the tongues ('wooden' planks that attach to the horse/oxen harness) at the front were added, also out of styrene. I added simple box seats to the front as well, and a foot rest for the driver.
For the two vardo styles, the roof for each was created slightly differently. The flat room was a single sheet of textured styrene, with additional styrene strips adding along each end. The curved roof also started with a support of a thin styrene sheet (gently pulled along my table edge to give it a subtle curve), and glued with PVA. Then balsa wood strips were cut to length and glued horizontally (again using PVA). Once dried, I added a stove pipe to each using my thinner styrene tubing.
To protect the exposed form and prepare it for priming, I gave it an even coat of Mod Podge Matte tinting with black acrylic paint. While it may seem counter-intuitive to base with black when I want brighter colours, it would provide better contrast to the recesses once the whole wagon was primed white.
Once I was happy that the foam would not be damaged by any solvents in the spray primer I gave both an even coat in a matte white. To see how I painted each, check out the blog post here!


Comments